Your Journey to Enso (from Alteryx)
Introduction
Enso is a platform designed to automate data preparation, allowing analysts to focus on what they love. Whether on the desktop or in the cloud, Enso boasts 100% compatible workflows. Enso isn't just another analytics workflow tool—it's a thoughtfully designed data platform. Enso enables users to access data catalogs, prepare and analyze data, and deploy automated solutions, making it a favorite among analysts, developers, IT departments, information security teams, and management. Enso's extensive data catalog offers automatic lineage tracing, providing insights into the origin and use of data within workflows. The platform infers data schemas, allowing seamless switching of data origins or destinations, which simplifies testing and production conversions. With unified data security and classification, Enso caters to enterprises and small businesses alike. Comprehensive access and entitlement audits ensure all user activities are logged, tagged, and searchable.
Purpose of the Document
This document is designed to assist advanced certified Alteryx users in beginning their journey with Enso, facilitating the migration of analytic workflows into this innovative platform. It aims to provide:
- Overview of Enso: A comprehensive introduction to Enso, highlighting its unique features and capabilities that differentiate it from other analytics workflow tools.
- Comparative Analysis: Insights into the similarities and differences between Alteryx and Enso, helping users understand the strengths of each platform and how Enso can complement or enhance their current workflow practices.
- Migration Guide: Suggested best practices for migrating existing Alteryx workflows to Enso, ensuring a smooth and efficient transition.
- Practical Tips: Expert tips and strategies from an experienced Alteryx ACE on leveraging Enso's capabilities to optimize data preparation, analysis, and automation.
- User Experience Insights: Personal reflections and experiences from transitioning to Enso, offering valuable perspectives and advice to help users adapt quickly and effectively. By the end of this document, advanced Alteryx users will be equipped with the knowledge and confidence to integrate Enso into their analytics workflow, maximizing productivity and achieving new levels of data automation and insight.
Embarking on your Enso Journey
Enso is a powerful, user-friendly tool designed to streamline data processing, analysis, and visualization. This overview will guide you through the initial steps to get started with Enso, from installation to creating your first project.
Getting Acquainted with the Interface
Upon launching Enso, you will be greeted by a clean and intuitive interface consisting of the following main components:
Data Catalog: (Cloud / Local).
Workflow/Projects: The central area where you design and visualize your data workflows.
Creating Your First Project
Step 1: Start a New Project
- Click on
+ New Projectto create a new project.
Step 2: Import Data
- Click on the
+ Inputbutton in the toolbar or drag and drop your data file onto the canvas. - Enso supports various data formats, including CSV, Excel, JSON, and databases.
Step 3: Explore and Clean Data
Step 4: Build a Workflow
- Connect the next component by choosing
New Componentfrom the current component's hamburger menu, found in the Quarter Circle Menu when you mouse over the comoponent. - Configure each component by assigning one or more constants, variables, functions, and operators.
Getting started with Enso is straightforward, thanks to its intuitive interface and support resources. By following this guide, you'll be well on your way to creating and automating powerful data workflows and visualizations that can help you gain valuable insights from your data. Happy analyzing!
Important Highlights
What Enso Does Have:
- Component configuration is displayed right on the canvas
- Continuous Workflow Execution
- In-Memory and In-Database use SAME workflow components
- Deskktop and Cloud use the SAME workflows
- Workflows are code-based and GitHub friendly
- Workflows support inclusion of documentation that is WYSIWYG Markdown friendly
- Simple JSON parsing
- Fast moving product delivery team
What Enso Doesn’t Have:
-
Sunchronous Run Button -
Different components for local vs cloud or in-memory and in-database -
Single-Thread, Multi-Thread & Compatibility modes with different answers
Understanding Enso (in terms of Alteryx)
Overview of Enso (MarqueeCReW's guide to learning Enso)
As a long-time Alteryx user I became accustomed to seeing a canvas, plus a configuration panel, plus a tool-pallet, plus a results window. Beyond these windows there is the windows toolbar with an array of menu options to learn too. I’m Windows-based, so my perspective is that of Microsoft. When you start using Enso you’ll see that the Graph Editor carries everything you need to know about your work in one place.
For those who know MarqueeCReW, I’m not getting any younger and my biggest challenge (in teaching this old dog some new tricks) is seeing the fine detail of the GUI and being able to precisely use my mouse to activate the GUI controls. Enso improves on ZOOM functionality to make it easier for me to see things, but I think that there is room for improvement here (for both Alteryx and Enso). As I have been providing feedback to Enso however, they are actively listening and have been making very fast updates to both the functionality and appearance of their product. I encourage you to to give your likes and dislikes to them on the community page (https://community.ensoanalytics.com/c/product-requests/) and test them out on their responsiveness to feedback.
Without a toolbar how do you know how to build a workflow? Everything looks the same when you start. First you’ll learn how to add a component to the workflow and then you’ll likely be starting with a Data.read component. You’ll quickly learn how to configure that component and start experimenting with the GUI to learn more nuances about the component. As you configure the component, you see mandatory arguments and have the ability to configure optional arguments (like what to do in the case of an error). You’ll also find that each component (not a tool) does one thing, but you should also find out soon enough that it does that one thing pretty well and that as you modify components you effect change on the entire workflow.
My strategy for moving forward is to know WHAT you want to do and break it down into little pieces. Accept that some things will require multiple steps, but realize that each component documents precisely what is being done. Watch the community videos (currently hosted by Adam Riley) and maybe watch some of my content on YouTube or on their community pages too. Whoever said that you learn from your failures and not your successes was right. I stumbled and asked for help. The Enso community stepped in and helped me. I’m here now to return that favor.
Graph Editor
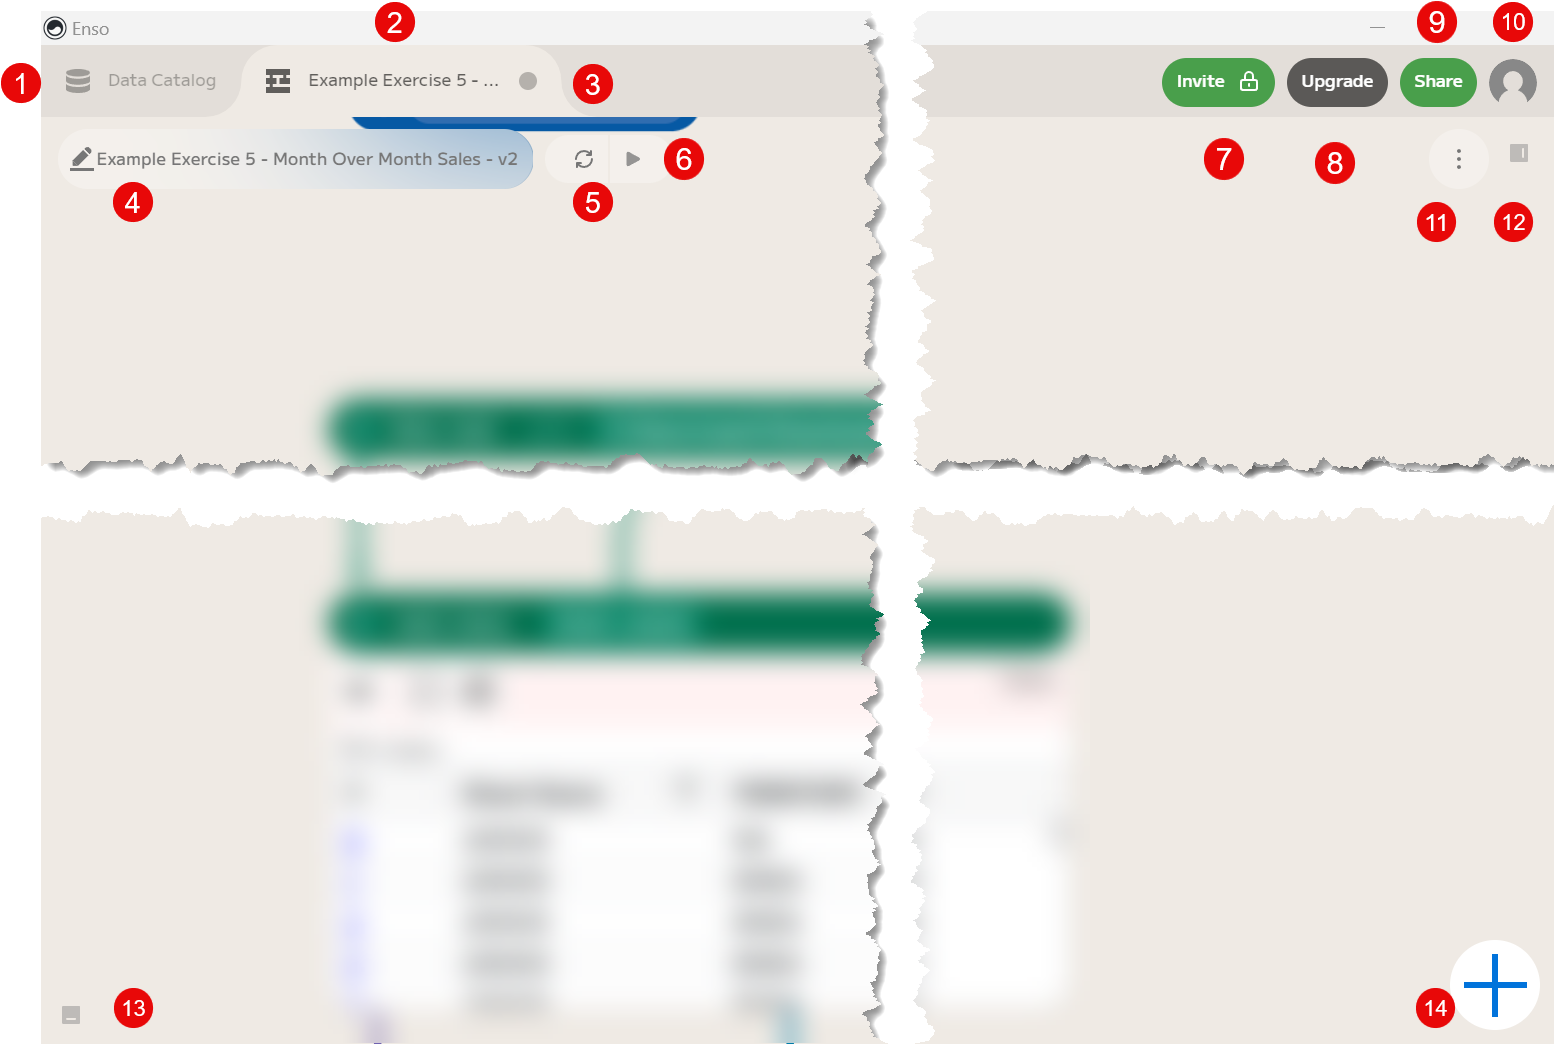
- Data Catalog
- Workflow Tab
- Close Workflow
- Workflow Name (yes, you can edit it)
- Refresh Workflow
- Write to all Output Destinations
- Invite (if upgraded allows team collaboration)
- Upgrade (features and functionality)
- Share
- User Settings
- Additional Options
- Workflow Documentation
- Code Editor
- Add new component to workflow
Component Configuration

- Component Options (Write Always, Code Edit, Visualize, Delete, Color, Comment, Open Documentation)
- Write Always
- Code Edit
- Visualization
- Add Component (connected to this component)
- Component type
- Parameter
- Argument
- Connection
- Connection (upper half will keep connection to source and allow you to switch the connection to a different component/component argument)
- Connection (lower half will keep connection to the target component and allow you to switch the connection to another source component output anchor)
Component Configuration
| 1 - Component Options A - Write Always - produces output to a connected write destination B - Code Edit - makes the underlying code editable for the component C - Visualization - displays a sample or all of the outgoing data D - Delete - deletes the component E - Color - allows for a change of color for the given component F - Comment - adds an annotation above the component G - Open Documentation (F1) - opens the side documentation panel |  |
| 2 - Write Always Produces output to a connected write destination. |  |
| 3 - Code Edit This is equivalent to viewing/editing the Alteryx XML. It is convenient to be able to see and update the code of a given component, but it is cooler to be able to simply replace the text with another component name and watch the component switch. Code Editing will become your friend as you use Enso. |  |
| 4 - Visualization I recommend reviewing the output data as you build and test your workflow. After you minimize/close the viz, you can always go back and restore the view and sample or display full data content if things have changed and you want to double-check your work. |  |
Enso Components
Overview
The first thing that I had to do during my Enso journey was to STOP thinking that this is Alteryx and START thinking about what I was trying to accomplish. The WHAT is the same, but the HOW is different. Alteryx created tools that combine functionality for ease of use and focus on the GUI (along with speed). Enso isolates functionality into components and makes the workflow easier to test, maintain and as such it creates an auditable workflow.
Enso is designed using a Single Responsibility Principle (SRP) from the SOLID principle of object-orient programming. Each component performs one specific task or responsibility. This provides for simplicity and clarity to make each component clear and with a specific purpose. It translates to making the workflow easier to understand and maintain. When issues arise, it’s simpler to isolate and fix problems within a single well-defined function. For more explanations about SOLID: SOLID - Wikipedia
Constructing Enso Components from Alteryx Favorites
| Alteryx Tool | Enso Component(s) |
|---|---|
| Browse | Every component supports visualization in a variety of methods Enso offers the choice to sample or visualize an entire set of data. Additional tools to view the data are unnecessary.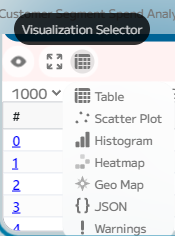 When viewing tabular data, you will be able to pin, autosize, filter and sort your data. These actions do not affect the data itself however as they are for data discovery only. 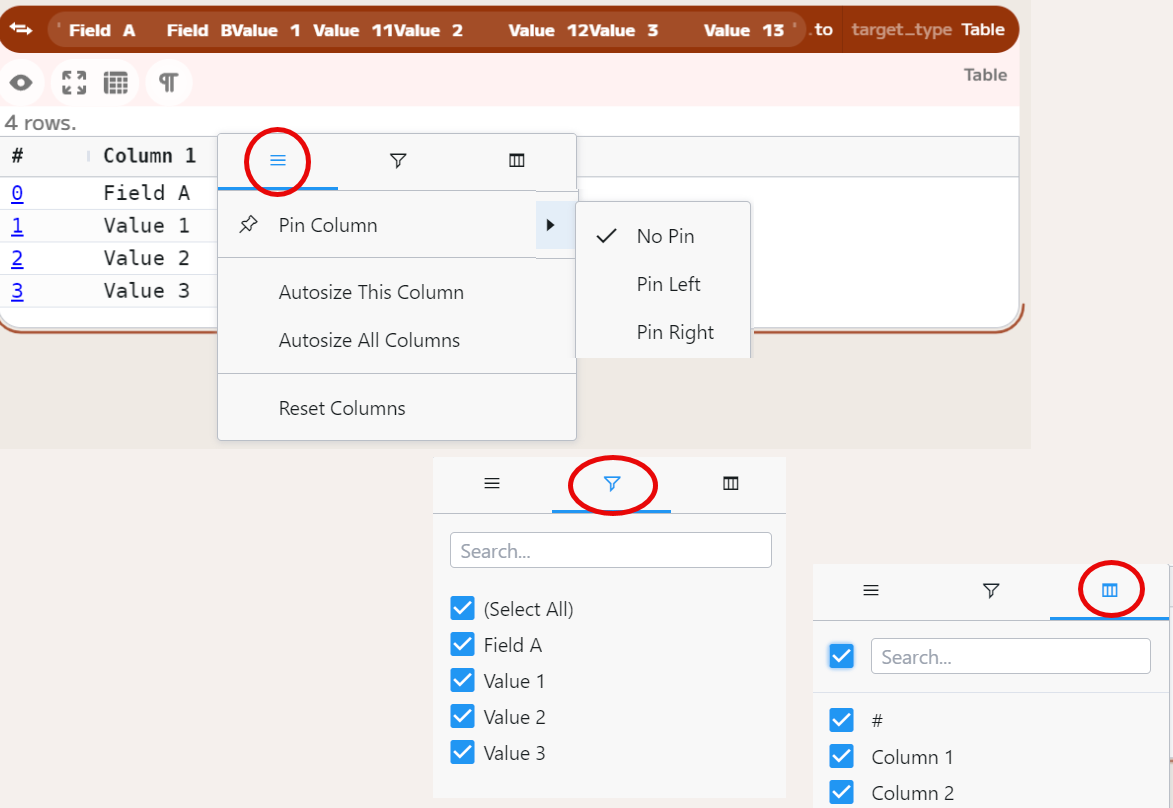 |
| Input Data | Data.read, read, read_many Data.read will likely be the first component which you will add to a workflow. The read of an Excel workbook requires either multiple Data.read components, or the addition of multiple read components, or a read_many component. |
| Output Data | write Use the write component as you would the Output Data tool, given a few caveats. If the output file is open and Enso attempts to write to it, you’ll see a warning message indicating that the file was written to a temporary file and that by pressing the write button (looks like a play button), that the output will be written to the now closed file. This cache function is very handy and you’ll be thanking the folks who developed it soon enough.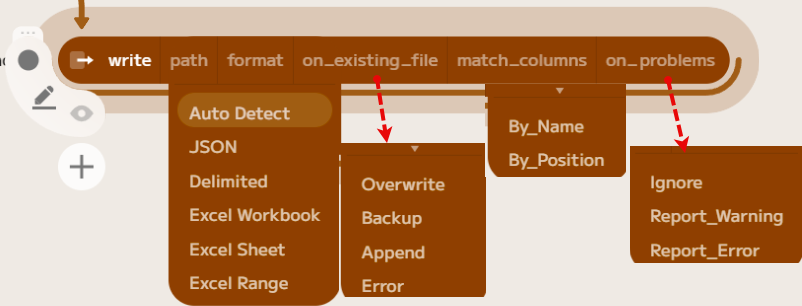 Depending on the type of output, the parameters will change. There is explicit control of the write action when using Enso.  Note: The ability to write to flat .txt files requires additional component actions prior to the Write component as does the ability to “Group By” and create multiple physical files from a single input stream. While Enso currently has a read_many component, it does not (as of the time of this writing) have a write_many component. |
| Text Input | Table Enso currently supports the pasting of a table into the workflow. Simply copy a source table (e.g. Excel) and paste the contents into Enso. The result is a table picured below. 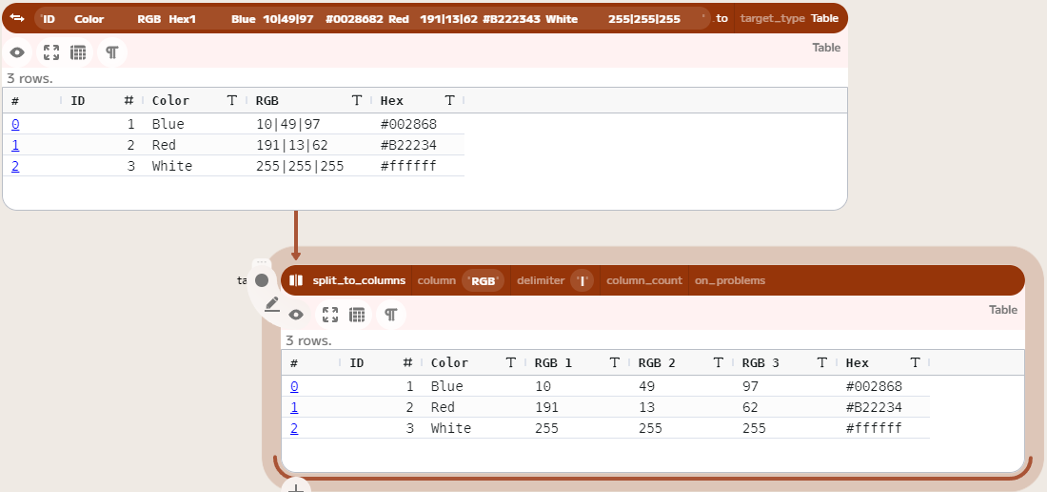 Using the code editor, you can adjust the contents if necessary: 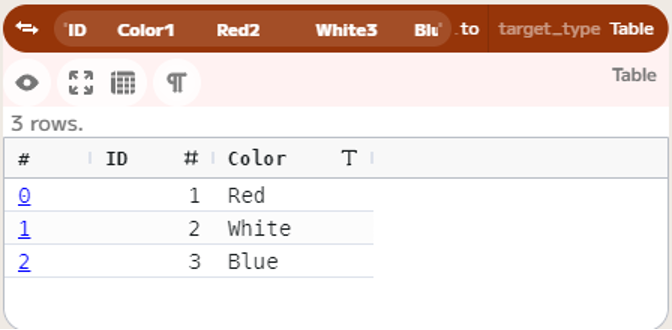 In practice, it is better to externalize the data from the workflow as it separates the business logic from the data, makes the process more maintainable and is easy to test with. Enso does readily allow for creating parameter values as constants/variables where the technique of setting the constant is a useful trick. The example on the left is created by adding a new component and typing: ‘3’ while the example on the right is by simply typing the meaning of life, 42. Now these parameters can be used to connect into another component such as take. |
| Data Cleanse | text_cleanse Enso’s text_cleanse component operates similarly to that of Alteryx’s Data Cleanse macro. The Alteryx macro is meant for beginners as it does not scale with larger sets of data. Enso has individual components that easily remove empty columns and rows (remove_blank_columns and filter_blank_rows) efficiently and clearly. I recommend expressly documenting each cleansing action with its own component. Make your code more readable, testable and maintainable by avoiding these beginner traps. |
| Filter | filter Enso applies the filter condition to a single action of: Keep or Remove. It extends the configuration options and performs more programmatic functions into the definition of the filtering event. Understanding the intent of the filter is straight-forward and with functions like, “NaN” (Not a Number) or IsFinite/Infinite, error detection is simplified. 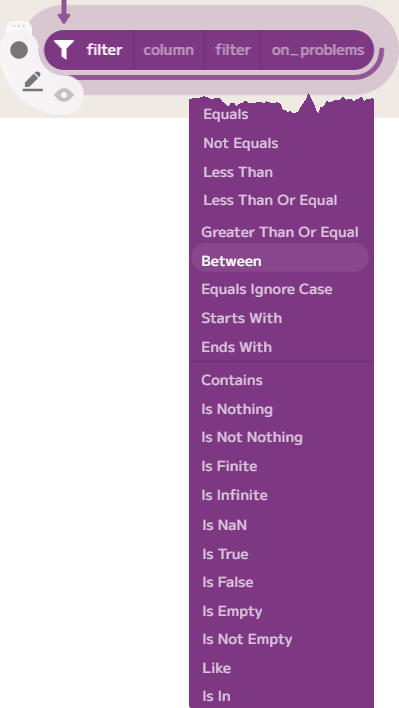 Note: Converting a single-filter using both True and False output anchors into two (2) Enso components takes a moment to adjust to. I quickly converted to this approach after considering chained filters in Alteryx and how this single-output approach is a better strategy for readability and maintenance of the workflow. |
| Formula | set Enso has a growing library of expression functions. It currently has a more limited set of delivered expressions than Alteryx. The drive is to produce the most meaningful functions as early as possible in the product development life-cycle. If a function is required (and not present), please raise the concern in the community and it will promptly be addressed. The set component adds and/or updates a single column of data. This makes the set component more testable and maintainable. Assignment of a value is easily configured and the set component allows for both simple and verbose expression editing. Depending upon your “set_mode” you can assign “on_problems” actions which will give you more control of your workflow if the incoming data does not contain the expected input columns of data. 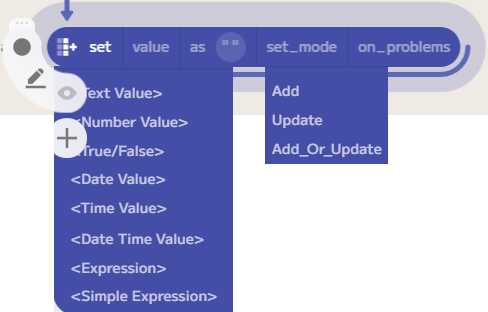 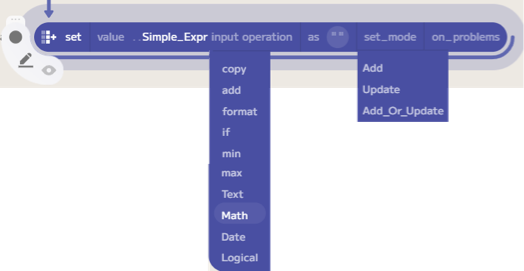 Note: As of the time of this writing, the Set function documentation is being simplified for easier consumption by both advanced and beginner Alteryx users. |
| Sample | take Enso extends the ability to sample with functions such as While and Sample (random/seed). 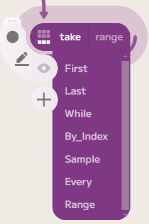 Note: As of the time of this writing, the take component does not include a grouping function. A combination of components is required to construct this outcome. |
| Select | remove_columns, rename_columns, select_columns, format, parse, cast Enso explicitly transforms the incoming data and provides clear documentation of the action. Additionally, the arguments for each parameter can be read dynamically by attaching incoming data to those arguments. This simplifies the externalization and management of the select actions and results in greater automation, testability and control of the data than in Alteryx.       ** Note: Alteryx has an “Unknown Fields” checkbox which if left unchecked prevents new data from being passed downstream. Enso provides the ability to define “expected fields” and provides the option to error on missing columns (rather than providing warning messages which generally go unnoticed). Enso also has the ability to configure components to perform the dynamic removal of “Unknown fields” and alert the process to the potential issue of their presence. |
| Sort | sort Enso sorts outgoing data by single or multiple columns of incoming data. It also has the functionality to differentiate sorting based upon upper and lowercase text values in the sorting process.  Note: A sort_columns component also exists in the delivered Enso (a CReW macro) product. |
| Join | join  Joins two (2) tables according to the specified join conditions. Arguments: (right, join_kind, on, right_prefix, on_problems) Join Kinds: (Inner, Left_Outer, Right_Outer, Full, Left_Exclusive, Right_Exclusive) 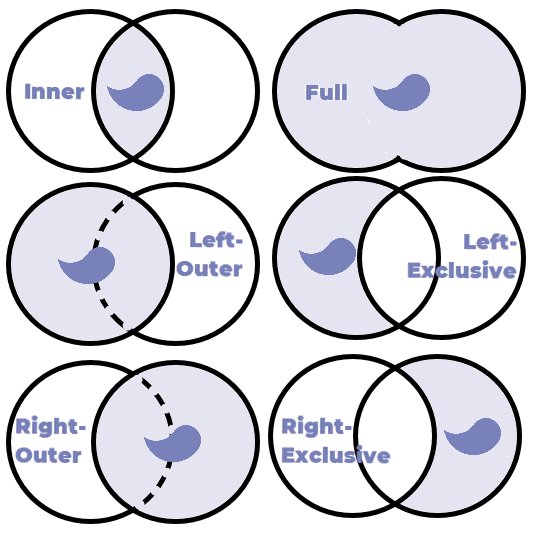 |
| Union | union, join Because Enso joins will satisfy both the join and the union tool combinations in a single component, the need to use a union component in Enso might be unnecessary depending on your use case. The union component takes inputs from one or more data sources. Use the plus (+) button to add a connection to each additional source after the first selected union. It can also limit the output data columns to every (In_Any) or common (In_All) or specified (In_List). 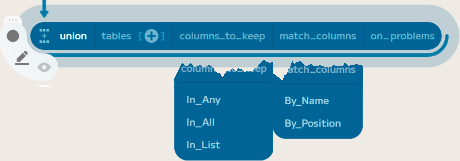  ** Note: The output of column data types and ordering should be consistent with the results of Alteryx, but differences may be present (when different data types are merged). Enso warnings (e.g. data precision) may also differ. |
| Text to Columns | split_to_columns, parse_to_columns Using split_to_columns, you can apply either standard or a custom delimiter to the data from a dropdown menu or manually entered. As you configure the component, you immediately see the results of your actions and can adapt the action as needed. 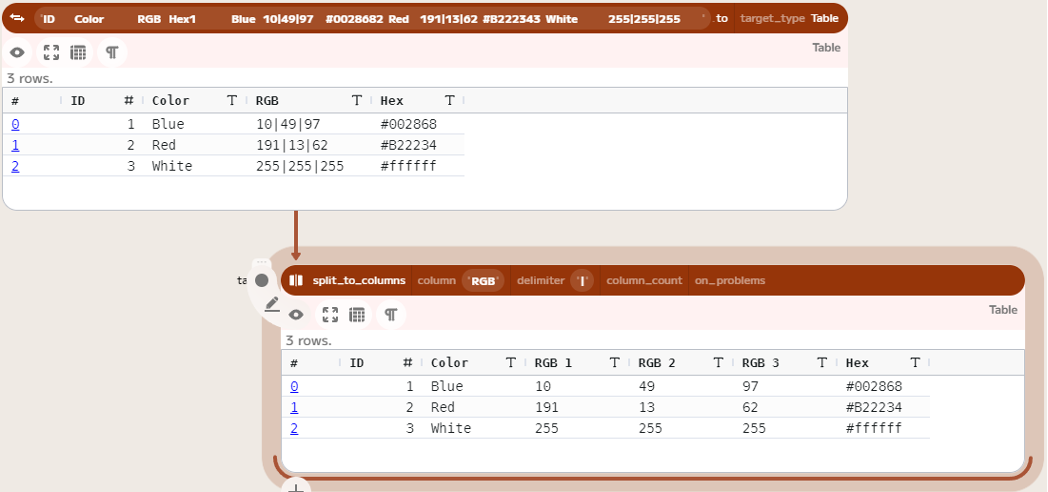 Note: The split_to_columns uses the root-field name for assignment of split values. You can control how many columns to pass (e.g. First 3 or All) and determine if a warning or error condition will be flagged if the column count is in error. Furthermore, the custom delimiter would allow you to support more than 1 consecutive delimiter as a configuration option (e.g. comma-space). Enso takes the parsing further with the parse_to_columns component. It accepts Regular Expressions to parse text into columns. If you use “named groups”, the output field is removed and the newly generated data columns are present (with data if you know your RegEx. Without the more complicated “named groups”, the new groups are output with the original field name plus [N]. Errors can be reported if the output names conflict with existing fields. 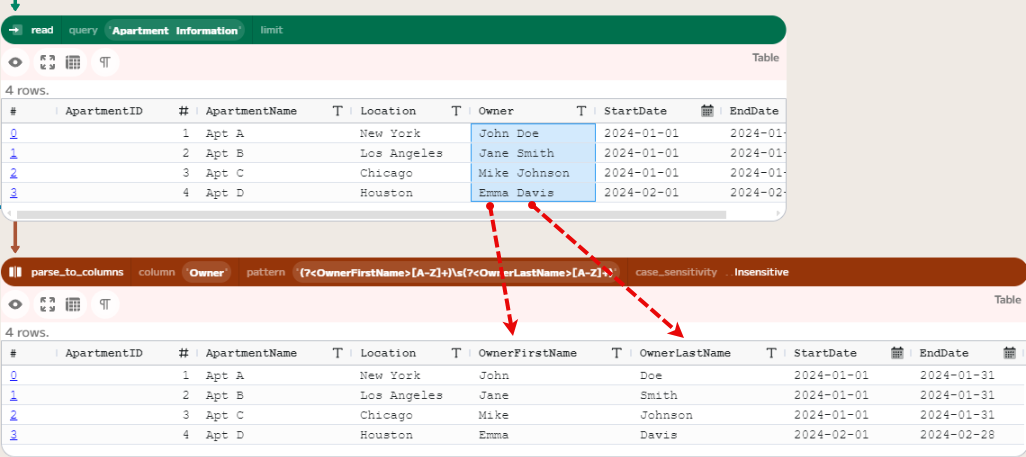 *Note: The output of the column displays “Nothing” if the pattern doesn’t match the data. The dependency on RegEx may make this component less approachable by new users. Example above uses this simplistic pattern: (?\<OwnerFirstName\>\[A-Z\]+)\\s(?\<OwnerLastName\>\[A-Z\]+)’* |
| Summarize | aggregate The visibility of the aggregation configuration in Enso makes this component much easier to understand and test. 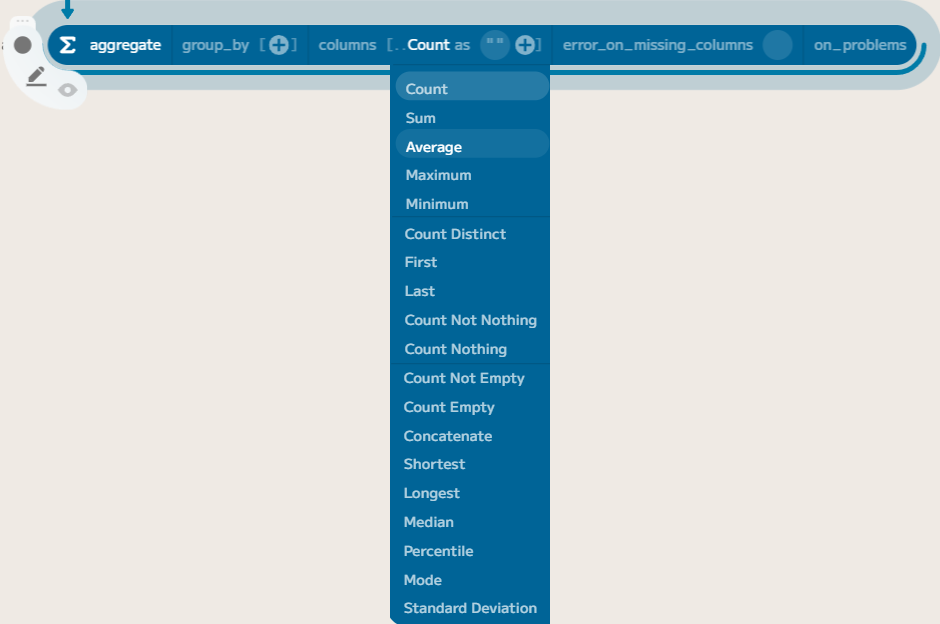 Concatenate is a good example of how easy it is to understand the configuration of a component.  |